Here’s a fun little treat box that you could use as a gift tag on top of a wedding gift! Just add some Hugs and Kisses chocolate! OR you can use this as a wedding party favor!
With the wedding season upon us, I thought this would be a fun and simple wedding, anniversary, or even New Years card at the end of the year! I had so much fun with the Mixed Drinks set!
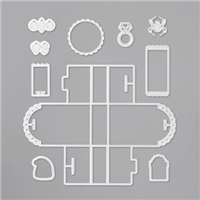
We were invited to a wedding this weekend, so it was the perfect opportunity to make my wedding convertible again! The trunk lifts up and you can insert a gift card or cash. You can purchase the tutorial HERE. This is a fun and unique wedding or anniversary gift!
The card is an old one I had, I’m so sorry I don’t have instructions for it, but I found the pattern on Pinterest.
Valentine Banner Tutorial $3.95 This tutorial is for the BANNER ONLY!
Remember, any order from my Stampin’ Up online store HERE qualifies you for any free tutorial on my blog, including this one! Also, it’s Sale a Bration time, and if you order at least $50 in products, you earn FREE SALE A BRATION PRODUCTS! Check out the brochure to the right to see all the FREE PRODUCTS that are available!
My instructions are clear and easy to follow, and contain many photos!
To purchase, please click on the “Add to Cart” above. The Tutorial Store Cart on the right side of this page will update. You can keep shopping or checkout. The Cart and Checkout pages are also available in via the Tutorials for Sale menu.
Once you choose the tutorials you would like, and payment is made via Paypal, you will immediately receive access to download your tutorials.
If you need any stamping supplies, please visit my Stampin’ Up online website HERE. If you place an online order from my website, you can choose any tutorial for FREE!
Please contact me [email protected] if you have any questions or issues.
Have you considered being a Stampin’ Up demonstrator?
As a member of my team, you also get all PAST/PRESENT/FUTURE tutorials for FREE! Let’s Chat!
Happy 1st Anniversary to our daughter Brittany and her husband Blake!
It’s been a trip down memory lane this week! Today marks the ONE YEAR anniversary of our daughter’s wedding. WOW the year has gone fast! I thought I’d share a video of her wedding.
Do you know I haven’t even shared the PAPER CRAFTING projects from the wedding yet? I know, I KNOW it’s long over due! I’m working on tutorials and hope to post them soon!
Thanks for letting me share a special day in history today!
I have SO MANY wedding projects to post, but am putting a tutorial together that will soon be on my blog!
For now, I will post the wedding card I made for our daughter and her husband. The wedding cake part is a CASE of a card I saw on Stampin’ Connection by Carol Lovenstein. I didn’t see a blog addy for her or I would link it here. I changed the card design and colors but loved how she did the cake! There are LAYERS to this card, which is hard to see in the photo.
Notes: To make the small scallop on the cake pedestal, I punched 2 squares from the Scallop Square Punch and taped them together, then cut just the scallops off. The bottom of the pedestal is made using the round tab punch. The cake has a black cardstock strip (bottom line of each cake layer) that is embossed in white with the same words.There are dimensionals used on almost every layer of this card.More wedding projects to come!!
Our daughter, Brittany, got married last weekend!!! Here are some photos and a slide show in case you are interested. Now you know why I’ve been away from my blog!!!! 🙂 What a fun weekend we had….it was such a beautiful wedding – surrounded by family and friends. We are BLESSED to add Blake to our family!!
Sorry I have been MIA lately! Our daughter is getting married in 5 days and I’ve been a little busy here! Soon I will have a bunch of wedding projects to show you! Here’s a photo of our daughter, Brittany, and her fiance’, Blake! This has been such a fun and exciting time in our lives! We are so excited for them and the road ahead! Speaking of wedding, here is a wedding card we made at one of my recent classes. Recipe
Stamp Set: Love & Laughter
Paper: Crumb Cake, Baja Breeze, Soft Suede, Very Vanilla
Ink: Soft Suede, Baja Breeze
Accessories: Baja Breeze Pleated Ribbon, Basic Pearls, Dimensionals, Heart Sizzlet, Heart Punch, Vintage Wallpaper Embossing Folder
This is one of my Girl’s Day/Night Out cards from this month. This card is much prettier in real life! The camera just doesn’t capture the details on the “frosting” part of the cake!
One of my downline (Linda Rodenberg) did a version of this card HERE. She used beautiful RICH colors! It’s amazing the different looks you can get with the same card, just changing the colors!
I LOVED the made by Linda Aarhus HERE. I changed the colors and here is!
The “O” in the word do has a rhinestone in it, which is hard to see here.
Recipe:
Stamp Set: Word Play (30% off until the end of the month!! Only $20.27 for the clear mount! You can go to my SU website and order HERE.)
Paper: Very Vanilla
Ink: Basic Black
Accessories: Elegent Linda Embossing Folder, Basic Rhinestone, Basic Pearls, Paper Crimper, Bo Ho Blossoms Punch, Dimensionals
The dimensions for the cake are:
Bottom Layer: 2 3/4″ x 1 1/2″
Middle Layer: 2 1/4″ x 1 1/2″
Top Layer: 1 3/4″ x 1 1/2″
Crimped strip is 1/4″ wide.
I “built” the cake on a 4″ x 1 1/4″ piece of scrap cardstock. That way it is easier to put dimensionals behind the cake piece and attach it to the front of the card.
My instructions are clear and easy to follow, and contain many photos!
To purchase, please click on the “Add to Cart” above. The Tutorial Store Cart on the right side of this page will update. You can keep shopping or checkout. The Cart and Checkout pages are also available in via the Tutorials for Sale menu.
Here is a wedding or anniversary getaway convertible that is a fun and creative way to give a gift card! The trunk flips up in back. You can slide a gift card in the trunk (or some CASH!) There are handmade Diet Coke cans that drag behind the car. There is also a bow-tie and wedding veil in the back of the car.
Once you choose the tutorials you would like, and payment is made via Paypal, you will immediately receive access to download your tutorials.
If you need any stamping supplies, please visit my Stampin’ Up online website HERE. If you place an online order from my website, you can choose any tutorial for FREE!
Please contact me [email protected] if you have any questions or issues.
Have you considered being a Stampin’ Up demonstrator?
As a member of my team, you also get all PAST/PRESENT/FUTURE tutorials for FREE! Let’s Chat!
The content of this blog is the sole responsibility of Lorri Heiling as an independent Stampin' Up! demonstrator and the use of and content of classes, services or products offered is not endorsed by Stampin' Up!
Stampin’ Up! Incentive Trip Disclaimer: Only about the top 1% of demonstrators earn this honor. I’m so grateful that, after many years of consistent effort and dedication to my business, I’ve been able to earn these incentive trips.


 Speaking of wedding, here is a wedding card we made at one of my recent classes.


